Hi all!
I don't have anything crafty as such to share with you today - its been a super manic weekend and I am going to enjoy a quieter day today relaxing and tidying the house!
On Friday night we went to Stuart's aunt Esther's. She was having a Stampin' Up party on the Friday night - she'd never been to a Stampin' Up event before so we were both quite excited! She had a good number of people attend and they all loved it. Its so great to see everyone having such a good time - it reminds me why I do this job! After everyone had left Est and I stayed up RIDICULOUSLY late chatting about guess what (?!) - Stampin' Up!! Its great to see that shes so interested and has so many questions - very tiring though!
Meanwhile the men (Stu and Steve) were off playing Scrabble and manly things like that.
On the Saturday we all went to Calke Abbey as a friend of Est's was going to take some photos of the boys - we had so much fun playing in all the trees and Steve broke a fence. haha. Lizzie got a few sneaky pics of the two of us as well - would be nice to have a decent photo of the two of us as the last time we had a proper photo of both of us was at our wedding almost a year and half ago! How time flies!!
Anyway we got back home late on Satuday night and I just crashed out (for about 12 hours) - the usual church etc on Sunday and now we are on Monday. The house is a tip so housecleaning is in order today, and this evening we are going to my friend Laura's house for dinner and to see her new place.
Come back tomorrow and I will hopfully have some crafty stuff to share!
Take care,
Amanda xx
Monday 31 October 2011
Sunday 30 October 2011
so timeless...
So, did you enjoy your extra hour this morning?! We have been away visiting Stuart's aunt, uncle and cousins - Esther had a Stampin' Up party and then we stayed for the weekend for some fun - got back last night completely shattered and so I enjoyed my extra hour snuggled up in bed asleep. I must've been out of it for almost 12 hours!! wowee!
Today's post features some of the Timeless Portrait DSP - thought it would be appropriate to have a 'time' related post seeing as the clocks went back! :)

Timeless Daughter
Stamp Set: For My Family
Ink: Versa Mark
Cardstock: Very Vanilla, Island Indigo
DSP: Timeless Portrait
Emboss: White Powder, Heat Tool
Big Shot: Lot of Tags
Punches: Decorative Label
Accessories: Very Vanilla Satin Ribbon, Brads
I just used a few scraps of the DSP to make this card and punched out the girl silhouette with a punch - I thought about cutting it out but thought that the blue just set it off against the vanilla background and it was quicker too!! I tied some ribbon on too and cut out a tag with the big shot. I embossed the word daughter on it and also embossed the brads white to tie in as silver didn't go!
Altogether a simple and elegant little card.
I hope you enjoyed seeing something else new in the catalogue - please do leave a comment and let me know what you think! I love reading them! Thanks.
Happy Stampin',
Amanda
Saturday 29 October 2011
simply stampin' challenge, week 31
This week over at the Simply Stampin' Challenge blog its back to a sketch challenge again! This week's is great so why not create your own card using it and submit it this week - you could be top 3 and I would love to see what you come up with!
Here's the sketch and my take on it!


Merry & Bright Dasher
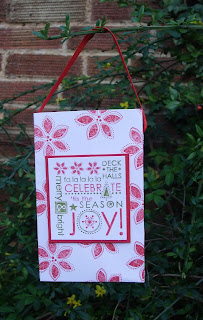
Stamp Set: Dasher, Serene Snowflakes, Season of Joy
Ink: Early Espresso
Cardstock: Crumb Cake, Naturals Ivory, Early Espresso, Riding Hood Red Textured
Punch: 3/4" Circle
Accessories: Dazzling Diamonds Glitter
I thought dasher would be perfect for this sketch - he's just so cute! I stamped the small trio of snowflakes over the ivory background as the design matched up really well with the snowflakes surrounding dasher's antlers. I decided I wanted to do a larger scallop edge than the scallop border punch would do so I punched a bunch of small circles and then adhered them in a row so half the circle was overhanging the edge. I added a strip of Riding Hood Red cardstock and added brown stitching lines to that strip and the scallop edge. The sentiment was done by colouring in only one of the sentiments on the block from Season of Joy - a great way to get more use out of the block! I adhered everything together and then finally added some spots of glue and added dazzling diamonds glitter! The sparkle really finished it off!
So, leave me a comment and then please head over to the Simply Stampin' Challenge blog, check out what the other design team members have created for you and then get creating yourself! I cannot wait to see what you come up with!
Happy Stampin',
Amanda x
Friday 28 October 2011
what you missed
For those of you who didn't make it to my class this month I thought I would share with you what you missed! We had so much fun this month getting into the Christmas spirit and making Christmas decorations (yay!!).


Thanks to all those who came and for those who missed it, why not come along to next month's class?! We will be making a re-usable advent calendar using a 24 hole muffin tin! It is SO cool - look out for a photo of it coming soon!! I already have quite a few booked on and only have a couple spaces left so hurry - book your spot today. Contact me on amanda_burditt@hotmail.co.uk
Thank you :)
Amanda x
Thursday 27 October 2011
for my bro
My brother is at university at the moment so we don't see much of each other, but it was his birthday on Tuesday so he came home for the weekend. It was great to see him again. Anyway today I just wanted to share the card I made for him and coincidently a new stamp set in the catalogue too! Its a great boy/manish set!!!


Happy Birthday Car
Stamp Set: Happiest Birthday Wishes, Need for Speed
Ink: Riding Hood Red, Real Red, So Saffron, Pool Party, Basic Grey, Basic Black
Cardstock: Riding Hood Red, Pool Party, Whisper White
Accessories: Red Baker's Twine (non-su)
Extras: Stamp-a-ma-jig
A very simple but very fun man card. I stamped the car and then coloured it in with stampin' write markers, and mounted it on a piece of Pool Party. I used the stamp-a-ma-jig to stamp the happy birthday in a row for a tone on tone background - I thought that it looked a little like a racing stripe - well it was the closest and most appropriate thing I could find. I wrapped some baker's twine around and then adhered the car to the top.
So, what do you think? Did you enjoy seeing a new stamp? I hope so!! Please leave me a comment and let me know what you think!
Happy Stampin',
Amanda xx
Tuesday 25 October 2011
a few wedding things
If you remember that at the end of August it was my cousin Ben's wedding to his beautiful bride Hannah. I just thought you would like to see the card and gift I made for them!

Stamp Set: I {heart} Hearts, Basic Phrases (Retired)
Ink: Not Quite Navy, Shimmer Paint
Cardstock: Baja Breeze, Not Quite Navy
Accessories: Pearls, Button
Extras: Mat Pack, Paper Piercer

Embroidery hoop with aida in it and filled with stitching - their names, wedding date and a Bible verse. A big buttons heart fills in the centre.

Finally a quick picture of Ben and Hannah.
Catch you again tomorrow,
Amanda x
Sunday 23 October 2011
continuing joyfulness
Again another quick and simple Chistmas card for you today - easy to duplicate for all those many people you need to send cards to at this upcoming festive season!

Joy at Christmas Doilies
Stamp Set: Delicate Doilies, Perfect Punches
Ink: Island Indigo, Pool Party
Cardstock: Very Vanilla, Island Indigo
Punch: Scallop Circle, 1 3/8" Circle
I stamped the doily in the centre but slightly off to one side and then without re inking the stamp, stamped the doily again above and below. It gives a lovely fading effect... I then stamped the sentiment and punched it out before layering it to the side with some dimensionals.
Come back tomorrow for another creative idea.
Happy Stampin',
Amanda x
Saturday 22 October 2011
christmas joy
Just a short little post today with a fun and quick Christmas card idea for y'all!

Joyful Ornaments
Stamp Set: Delightful Decorations
Ink: Cherry Cobbler, Old Olive, Early Espresso Marker
Cardstock: Very Vanilla
Punch: Ornament
Extras: D Block
I stamped the D Block on the cardstock. I love the textured effect this gives to the cardstock and means you get the colour layer without any added cardstock! I did a dashed stitching line around the end for some extra detail. Finally I stamped a few ornaments, punched and layered them up over the top.
This is definately a card that could be easily diplicated for lots of people - just what you need in the run up to Christmas time! Please do leave a comment and let me know what you think!
Friday 21 October 2011
let's host!
I've shown you several of the new stamp sets and DSP to hit the new catalogue but haven't shown you any of the gorgeous new hostess exclusive stamp sets!! There are some FANTASTIC sets so it is most definitely worth hosting a party to earn a few for yourself!!
Hosting a party is very simple, invite some friends and family over for a fun crafty evening. I'll bring some great projects to demonstrate and then you can all have a go yourself making something of your own. Supply some refreshments while your guests browse and then choose some wonderful freebies!
The hostess benefits have changed in the new catalogue, giving you more freedom to choose the products you want for free! Based on your party sales you earn Hostess Pounds which you are then free to spend on specially priced hostess exclusive stamp sets or on merchandise from the main catalogue (or on a mixture of both). What's more, when your sales hit £300 you begin earning products from the catalogue at half price! If the Big Shot is your dream, at half price its a steal at £44!!! How awesome is that?! So let's host! Pick up the phone and call me today on 07717206098 or email me at amanda_burditt@hotmail.co.uk.
One of the new hostess sets is the gorgeous Precious Butterflies - so pretty with lots of little butterflies to pepper your projects with!

Just for You Butterflies
Stamp Set: Precious Butterflies (hostess exclusive)
Ink: Lucky Limeade, Calypso Coral, Versa Mark
Cardstock: Pear Pizazz, Lucky Limeade, Calypso Coral, Whisper White
Emboss: White Emboss Powder: Heat Tool
Punch: Scallop Circle, 13/4" Circle
I stamped the butterflies in the background with a stamping off technique so they looked as if they were fluttering gently in the background. I stamped the butterflies and embossed the sentiment before punching it out and mounting a cut up scallop circle (so that the scallops showed as the scallop circle and circle punch were same size!). I stamped more butterflies on the calypso coral strip and mounted everything together.
I hope this has temped you to host a party yourself. And of butterflies aren't your cup of tea - there are plenty of other fab sets to choose from (look out for them over the coming weeks!)
Please leave me a comment - I love reading them! It gives me a break from crafting and I get to rest my very sore wrist - the doctor says I have gout. Its making lifting pretty much anything VERY painful - crumbs not good for a crafter!!
Happy Stampin',
Amanda xoxo
Thursday 20 October 2011
easy events
For any of you who know me, you'll know that I LOVED Fun & Fast Notes. So when it got retired last month I was a bit gutted - it was a great all round stamp set that had something for pretty much every occasion. So when the new catalogue came out I was eager to see what the replacement set would be. It is a very sweet set called Easy Events. It has both images and sentiments - its lovely!

Wedding Wishes Birdies
Stamp Set: Easy Events
Ink: Sahara Sand, Crumb Cake, Wild Wasabi, Rose Red
Cardstock: Very Vanilla, Crumb Cake
Big Shot: Vintage Wallpaper Emboss Folder
Accessories: Very Vanilla Seam Binding
Punch: Decorative Label
Extras: Sponge
I embossed and tore the crumb cake cardstock for a softer edge. I stamped the birds, coloured and punched out. Added some ribbon, the sentiment and assembled. Really simple but elegant little wedding card!
What do you think? I hope you liked this card, I'd love to know what you think!
Happy Stampin',
Amanda x
Wednesday 19 October 2011
gift bags with a difference
I was surfing the net one night a little while ago when I couldn't sleep and got into watching youtube videos, I find it quite theraputic watching others craft and often get some fab ideas. On this occasion and found this excellent tutorial for how to make a gift bag out of an envelope. Now, I'm stupid and didn't save a link to the video, I really wanted to share the link with you. This is such a fantastic idea - I'm always in need of gift bags for pressies and finding one that's the correct size is almost impossible and can end up being quite pricey!
Below are a few examples of Christmas themed gift bags in a variety of sizes (depending on envelope size) and also different closures! This was the make and take project we did at Sue's party last week.


Below are a few examples of Christmas themed gift bags in a variety of sizes (depending on envelope size) and also different closures! This was the make and take project we did at Sue's party last week.

Stamp Set: Season of Joy
Ink: Real Red, Old Olive
Cardstock: Whisper White Real Red
Accessories: Real Red Grosgrain
Extras: Crop-a-dile
Envelope: to fit A5 card

Stamp Set: Season of Joy
Ink: Crumb Cake, Rose Red
Cardsrtock: Crumb Cake, Rose Red
Accessories: Rose Red Seam Binding, Rhinestones, Linen Thread
Punch: 5 Petal, Boho Blossoms, Decorative Label
Extras: Crop-a-dile
Envelope: to fit A4 letter

Stamp Set: Season of Joy
Ink: Marina Mist, Night of Navy
Punch: Eyelet Border
Accessories: Rhinestone Brads, Linen Thread
Extras: Crop-a-dile, Paper Piercer, Mat Pack
Envelope: to fit square card

Stamp Set: Season of Joy
Ink: Daffodil Delight, Early Espresso
Cardstock: Whisper White, Daffodil Delight
Punch: Decorative Label
Accessories: Rhinestone Brad
Extras: Crop-a-dile, Paper Piercer, Mat Pack
Envelope: to fit A6 size card
I hope you liked today's share! They're so easy to make, have a go today!!
Hugs,
Amanda x
Tuesday 18 October 2011
dinoroar
One thing I love about the new Stampin' Up catalogue is the great new kids sets! Especially ones for guys! On of which is called Dinoroar. An ultra cute but very boy based stamp set with 4 dinosaurs and grass too! Plus a couple fun sentiments also! I've already made a couple cards with this set, here is the card I made for Stuart's cousin Nathan's 8th birthday.

Roar!
Stamp Set: DinoroarInk: Wild Wasabi, Certainly Celery, Garden Green, Basic Black
Cardstock: Whisper White, Wild Wasabi
Accessories: Certainly Celery Grosgrain Ribbon
Extras: Sponge
A very quick card. I stamped and coloured in the dino and then sponged the edges of the whisper white cardstock and also the wild wasabi card base. I stamped grass under dino and then tied some ribbon onto the card, stamped my sentiment and add the dinosaur on top.
I hope you liked seing another new set from the catalogue today. It really is a cute set and a must have if you know/have lots of little ones!
Please do leave a comment, they make my day to read them! :)
Have a lovely day, see you tomorrow for another creation!
Happy Stampin',
Amanda xx
Monday 17 October 2011
flirtatious speciality
Just a quick post today. A CAS of a card I found here but nobody's name so if this is your design - please take credit! So I found itonline when I was looking for inspiration for cards to make using the new Flirtatious designer paper. Folding the paper gives the dsp a bit of a different look and more body! I liked it so much that I decided to do the card as a demo at my Hostess Catalogue Preview party a few weeks ago - they all loved it too!


Flirtatious Ripple
Stamp Set: Just Believe
Ink: Versa Mark
Cardstock: Wisteria Wonder, Whisper White/Pretty in Pink, Melon Mambo
DSP: Flirtatious Speciality
Embossing: Embossing Buddy, Heat Tool, White Emboss Powder
Punch: Eyelet Border
Please leave a comment and let me know what you think! Catch you again tomorrow!
Amanda x
Sunday 16 October 2011
fun with flames
Anyone who knows me knows that I have a little bit of a thing for fire! Its just so pretty and fun! Anyway I was making a card using the Everything Eleanor stamp set - did I tell you I'm in love with this set at the moment?! So I was making this card and as this set is quite vintagey I thought it would be fun to see what it would look like to start burning away bits of the card and ribbon for a vintage burnt look.

Burnt Eleanor
Stamp Set: Everything Eleanor, Teeny Tiny Wishes
Ink: Early Espresso, Crumb Cake, Soft Suede
Cardstock: Crumb Cake, Very Vanilla
Big Shot: Vintage Wallpaper
Accessories: Pearls
Ribbon: Crumb Cake Seam Binding
Extras: Sponge
A pretty simple card of stamping, sponging and layering the various elements of the card, Its a very monochromatic card - all very brown. I think it really helps all the textures to shine through!
While creating this card i started burning elements of it with a lighter and candle. Love it! Probably not a card I would recommend trying at home - unless you are in a very unflamable place (you can imagine a craft room full of paper and fabric is not the best place to decide to experiment with fire!
Hope you liked this little experimentation, please do leave a comment. I love reading them! :)
See you tomorrow for another little creation!
Happy Stampin',
Amanda x
Saturday 15 October 2011
simply stampin' challenge, week 29
Its Saturday again and that means its the Simply Stampin' Challenge! This week is a colour challenge, which is as follows:

These are the colours that are in the new DSP - Frightful Sight. I don't go in for Halloween so I thought for all you non-halloweeners out there I would do something a little different.

These are the colours that are in the new DSP - Frightful Sight. I don't go in for Halloween so I thought for all you non-halloweeners out there I would do something a little different.

Glitterful Friend To Friend
Stamp Set: Greenhouse Garden, French Foliage, Teeny Tiny Wishes
Ink: Cajin Craze, Old Olive, Basic Black
Cardstock: Whisper White, Old Olive
Punches: Modern Label
Embossing: Heat & Stick Powder, Dazzling Diamonds, Heat Tool
Accessories: Rhinestones
So I haven't used the Greenhouse Garden stamp set for quite a while so I thought I would get it out and realised it pairs very well with the French Foliage stamp set. I used the 'kissing' technique I was explaining in yesterday's post on the flower and covered with heat and stick powder, then dazzling diamonds glitter. I did the same thing to the leaves. The background was stamped all over with the french script and water drop stamps in the French Foliage set (I stamped off the stamped images on scrap paper to give a softer background and really let the glittery flower stand out!). I stamped the sentiment on Whisper White cardstock, punched out with the Modern Label punch and then ran the Cajun Craze marker around the edge to help it stand out a little from the background!
I hope you liked today's card using the halloween colours to make a non-halloween card! Now hop on over to the Simply Stampin' Challenge blog and check out what the other lovely talented design team members have created and then enter your own creation! I'd love to see how you use these pretty colours!
Hugs,
Amanda x
Friday 14 October 2011
everything eleanor
Wow what a set!!! This is a new set in the catalogue and I just LOVE it!! Its called Everything Eleanor and its just absolutely fabulous! I think its my absolute favourite set at the moment! (Its not even in the American catalogue - that's how special it is!!) I'll share loads of cute projects done with this over the next few weeks but here's today's! This is one of the cards I demonstrated at Sue's party on Monday.

Thank You Kissing Birdie
Stamp Set: Everything Eleanor, Teeny Tiny Wishes
Ink: Baja Breeze, Soft Suede, Early Espresso, Versa Mark
Cardstock: Very Vanilla, Soft Suede
Big Shot: Vintage Wallpaper
Embossing: Gold Emboss Powder, Heat Tool
Accessories: Silver Brads
Extras: Sponges, Paper Piercer, Mat Pack
So this card highlights the 'kissing' technique. It involves inking up two stamps, a plain stamp (frame) and then another with pattern (flourish). Then you kiss the two inked stamps together. This means the pattern from the second stamp has now been transferred onto the plan stamp. Its a fun technique and really effective on this card. I then stamped the frame and cut it out, and used soft suede ink to sponge the edges and very lightly over the baja breeze frame to give it a vintage feel. I then ran the very vanilla cardstock through the big shot in the vintage wallpaper embossing folder. I stamped the flourish over the soft suede cardstock in soft suede ink to just add a little pattern and then sponged the edges before assembling the card. Oh the other thing I did was heat emboss my brads - I only had silver but wanted a vintagey gold brad so I inked up the heads with versamark, dipped them into gold powder and heated them. This is a great little trick if you don't have the right colour brads!
I hope you enjoyed this little card as much as I do, please do leave a comment and let me know what you think! As I said there's lots more to come with Everything Eleanor so stay tuned!
Happy Stampin',
Amanda xoxo
Thursday 13 October 2011
doilies
here's a bit more of a rustic style card using the Delicate Doilies stamp set. I used the colour scheme from the Simply Stampin' Challenge a couple weeks ago - Very Vanilla, Pear Pizzazz, Soft Suede and Chocolate Chip to create this card. I am really loving this colour palette, such lovely rich earthy colours!

Hello There Doilies
Stamp Set: Delicate Doilies
Ink: Versamark, Pear Pizzazz, Soft Suede, Chocolate Chip
Cardstock: Very Vanilla, Pear Pizzazz
Embossing: Clear Powder
Punches: Modern Label
Accessories: Pearls
Extras: Sponge
I stamped the larger doily in versamark and then embossed with clear embossing powder. I inked over the top of it with Pear Pizzazz and them stamped and embossed a few more smaller doilies and inked up with Soft Suede and Chocolate Chip. I punched out the Modern Label and hand wrote the sentiment. To finish it off I couldn't help but add some pearls! I'm going through pearls like crazy these days!
Please do leave a comment, I love hearing what you think!
Tomorrow I have something new for you using another new stamp set...its totally gorgeous and one of my new favourites! (even more so than delicate doilies!! Hard to imagine I'm sure!)
Happy Stampin',
Amanda xo
Wednesday 12 October 2011
p...p...p...pick up a penguin
Just a quick little CASed card for you today - sorry I didn't jot down the name and web address so if this is yours - please do claim the credit, I think he's awesome!
I found this on the internet when I was looking for interesting Big Show ideas to show my class ladies and came a cross this cute little guy! I've altered him a bit as I don't have any oval punches.

Penguin
Stamp Set: n/a
Ink: n/a
Cardstock: Basic Black, Whisper White, Pumpkin Pie, Real Red
Big Shot: Top Note
Punches: Decorative Label, Itty Bitty, 1 3/4" Circle, 1 3/8" Circle, Corner Rounder
Extras: White Gel Pen
His name is Marvin, he sits on my mantelpiece and is just such a happy little chappy!
Quite a simple card - even simpler if you own the correct punches, but if you don't, here's what I did - I punched out the circles and then temorarily adhered them to a piece of thin scrap paper so i could slid it back into the punch and re-punch. I kept of punching until I had the right shapes. It was a little fiddly but not too bad.
I hope you like him as much as I do. The question I have is, does he need a bow tie? Several people who have visited my house have commented on the lack of a bow tie, so what do you think? Is he missing a vital piece to his ensemble?
Please do leave a comment and come back tomorrow for another little creation!
Hugs,
Amanda x
Tuesday 11 October 2011
just add cake
Another of the new Designer Papers is called Just Add Cake. A collection of brightly coloured stripes, dots numbers, letters in really scrummy cake and icing like colours. It really is a very yummy pack!

Just Add Top Note
Stamp Set: Something to Celebrate (Hostess - Retired)
Ink: Wild Wasabi
Cardstock: Whisper White, So Saffron, Baja Breeze, Wild Wasabi
Punches: Modern Label, 5 Petal, 1" Circle, Itty Bitty
Big Shot: Fun Flowers, Top Note
So I cut squares of the DSP and adhered it in a patchwork style to the cardstock then ran it though the Big Shot. I assembled a flower out of cardstock in the same colours contained in the DSP. I finally stamped and punched out the sentiment and then ran my Wild Wasabi marker around the top note to give a very little extra definition against the Whisper White background.
I hope you liked today's share using some more new products! I have more Just Add Cake projects coming up over the next few days so please do stay tuned!
Let me know what you think and leave a comment.
Happy Stampin',
Amanda x
Monday 10 October 2011
stamp a stack
How would you like to had a lovely social evening (or two) of crafting and come away with 10 (or 20) Christmas cards for the upcoming festive season?! We all need Christmas cards and they can all add up and become a bit pricey. To help out with costs and to give you an evening of fun I am offering 2 Stamp a Stack evenings.
At each Stamp a Stack evening we will make 10 Christmas cards. These will include a variety of sizes and complexities for all your Christmas card needs. This will also include several flat (but still stunning) mail friendly cards!
Each evening will cost just £10. This includes all your materials plus plenty of tea and cake.
Stamp a Stack #1
Friday 21st October (7:30pm-9:30pm)
Stamp a Stack #2
Monday 14th November (7:30pm-9:30pm)
So, would you like a sneak peek? Of course you would! Here you go...


Its only a sneak peek though - plenty more Christmassy goodness to be had on the night!
I would love to have you all join me for these two special evenings, so please book your spot as soon as possible. I look forward to seeing you all really soon!
Happy Stampin',
Amanda xo
Sunday 9 October 2011
flirting some more...
I am in love with the ultimate girlie new DSP Flirtatious Speciality at the moment.

Flirtatious Just for You
Stamp Set: Just Believe
Ink: Melon Mambo
Cardstock: Pretty in Pink, Whisper White
DSP: Flirtatious Speciality
Punch: 1 3/4" Circle
Another really simple card showing off the gorgeous doilie patterns in the new Flirtatious DSP. I punched out 6 circles of DSP and adhered them to the card base. I stamped the sentiment on a piece of Whisper White and Pretty in Pink as a banner over the top of the circles. This card really shows off the lovely patterned paper.
I hope you enjoyed today's card, come back tomorrow for another look at some of the new products!
Hugs,
Amanda x
Saturday 8 October 2011
simply stampin' challenge, week 28
This week's Simply Stampin' Challenge is a sketch challenge. I have to admit this sketch wasn't easy, I really struggled with adding so many layers. Eventually I had to remove one layer as it just wasn't working out, so without further ado, here is this week's sketch and my card...


Season of Joy Christmas
Stamp Set: Season of Joy
Ink: Real Red, Old Olive
Cardstock: Whisper White, Old Olive, Real Red
Accessories: Whisper White Organza Ribbon, Pearls
Extras: Sponge
I used stampin' write markers to colour in the wording stamp in real red and old olive which really makes all the sentiments stand out from each other and breaks up what can turn to be a LOT of one colour! I then sponged the edges and added some trees to tie in the old olive and the poinsettias to tie in the real red. Final thing to add to this card was some ribbon - overall I am quite happy with how this turned out. What do you think?
Please do leave a comment and then head over to the Simply Stampin' Challenge blog and check out the other design team member's entries. Please do enter yourself, I'd love to see how you interpret this sketch!
Happy Stampin',
Amanda x
Friday 7 October 2011
decorate for christmas class
Just a sneak peek of a few of the projects we will be doing at the Decorate for Christmas class on October 15th and 19th. These samples use the previous and now retired Jolly holiday DSP, we will be using the really gorgeous new Holly Berry Bouquet Speciality in this month's class!

Funnel Ornament

Wreath Ornament

Mini Christmas Tree decoration
As well as these 3 projects I have a few other ornaments lined up for you to make but they're a surprise! So why not come along, have a go at making several ornaments and decorations. They are all quite simple and inexpensive to make but look lovely in the tree or around the home. The perfect decorations or even gifts!!
If you would like to attend class this month please do book asap as spaces are limited and I guarantee you will have fun! Cost is £13.50, well worth it for 3 hours of crafting, chatting, tea and cake.
Hope to see you there!
Amanda x
Thursday 6 October 2011
quick and important note
Just incase any of you are coming to my launch party tomorrow evening for the new catalogue I am really sorry to say I have had to cancel it at the last minute. I am so sorry for any disappointment caused and I hope you will all be able to join me for another of my events in the near future!
Thanks again,
Amanda x
feeling a little flirtatious
So another card today using some of the new products from Stampin' Up! Today is the GORGEOUS flirtatious Speciality designer paper! It co-ordinates with the Delicate Doilies stamp set and is just beautiful shades of Wisteria Wonder (another of the brand new in-colours this year), Whisper White, Melon Mambo, Pumpkin Pie, Pretty in Pink and Daffodil Delight. The papers are just packed full of beautiful doilie shapes including 2 12x12 sheets of laser die cut doilies! This is definitely a double dose of all girlieness! Love it!

Hello Flirtatious Doilie
Stamp Set: Pennant Parade
Ink: Melon Mambo
Cardstock: Whisper White, Pretty in Pink
DSP: Flirtatious Speciality
Accessories: Pearls
I cut out one of the die cut doilies from the sheet, if you cut carefully there's plenty to use and you won't waste any of the other doilies. I decided it looked stunning enough by itself and therefore left the card very simple, just adding a sentiment to the bottom right hand corner and accenting the card with a few pearls. The centre pearl also cunningly hides the dimensional popping the doilie off the card base.
I hope you enjoyed this quick and card using some beautiful new DSP. If you liked this card using the Flirtatious DSP stay tuned over the next few days as I have more Flirtatious goodness coming your way! Please do leave a comment and let me know what you think. I really do love reading them!
Come back tomorrow for another creation!
Happy Stampin',
Amanda xx
Wednesday 5 October 2011
a little bonus - happy birthday mum
A little bonus post for you today, just wanted to share the little card I made for my mum's birthday last month.

Birthday Flowers
Stamp Set: Something to Celebrate (Hostess - retired)
Cardstock: Rose Red, Garden Green, Very Vanilla, Crumb Cake
Ink: Rose Red, Garden Green
Punch: Bird, Boho Blossoms, Itty Bitty, 5 Petal Flower, Corner Rounder
Accessories: Rhinestones, Rhinestone Brads
Big Shot: Lots of Tags
Extras: Crimper, Sponge
Hope you enjoyed this quick little post today. Isn't the card gorgeous?! And so simple to make!
Happy Stampin',
Amanda xx
pearl wedding
Last month was my mother-in-law and father-in-law's Pearl Wedding Anniversary and today I just wanted to share with you the special card I made for them.

Pearl Wedding
Stamp Set: Something to Celebrate (Hostess - retired)
Cardstock: Crumb Cake, Very Vanilla, Sahara Sand
Ink: Crumb Cake
Punch: Bird, Boho Blossoms, Itty Bitty
Accessories: Pearls, Frost White Shimmer Mist
A very simple card in very neutral colours and then spritzed with lots of shimmer mist to make it EXTRA extra glimmery and special. Finally I added some pearls to finish off the card and also because its a Pearl wedding - a just cause for pearls!
Come back tomorrow for another creation!
Hugs,
Amanda xoxo
Tuesday 4 October 2011
delicate doilies...
Today I have another quick share with you, another card made using the Delicate Doilies stamp set - can you tell it is becoming a rapid favourite?! This card was for Stuart's aunt Deb's birthday which was on Saturday.

Happy Birthday Doilies
Stamp Set: Delicate Doilies
Ink: Pool Party, Lucky Limeade, Versamark
Cardsotck: Pool Party, Whisper White
Accessories: Rhinestone Brads, White Embossing Powder
Punches: Modern Label
Extras: Embossing Buddy, Heat Tool
I stamped the doilies in the background and then heat embossed a white doilie over the top I hand wrote the sentiment and punched it out with the modern label punch. I finally finished off the embossed doilie with a green rhinestone brad. This is using two of the two new in-colours - pool party and lucky limeade. Both are really lovely!!
Please do comment, and come back tomorrow for more creations.
Happy Stampin',
Amanda x
Subscribe to:
Posts (Atom)